Thursday, October 8, 2020

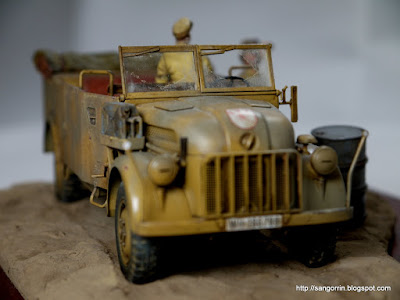
Tamiya German Steyr Type 1500A/01 making

This will be the last post for today and I will explain the process I used to create a diorama for the Tamiya German Steyr 1/35 kit.


This kit is quite good, much better than what I thought. All the parts fit great and there are a lot of extra objects and even figures that are not included even in the manual.


When I assembled the kit, one of the things I liked the most was how easily they solved the modeling of this net using this thin clothing. No need for metal parts here.


After assembling the kit, I applied a coat of Mr. Color surfacer Oxide red. I like using this surfacer because if the base color had a cut, you would see some rusty color which is fine.


After letting the surfacer dry, I airbrushed the base colors. Here I am using acrylic gouache colors because the are not toxic, they don't smell and they are super cheap in Japan.


Next, using acrylic gouache as well, I painted all the small objects and details.


After that, I applied a coating of lacquer glossy varnish to protect the acrylic gouache from the next steps.


Although I typically use Mr. Weathering color for the pin washes here I decided to try oil paint. Before using the oil paint, I put it into a piece of kitchen paper and let it absorb the linseed oil that comes with the paint. That will make the paint dry faster when we apply it to the model. You can use any artistic solvent you prefer but I suggest using odorless petroleum. Otherwise, scale modeling thinners such as MIG:s enamel odorless thinner or Mr. Weathering solvent 110 work as well.


Next, I added some streaking effects and chipping all over the vehicle using the same oil paints. It's important not to overdo it. For the chipping, I learned some good tricks from YouTube.


For the front windows, I applied a very diluted solution of Mr. Weathering color grayish brown.


The kit comes with many figures but I will only use 3 of them for my diorama. I painted the figures by brush using again acrylic gouache.


Then, I applied a lacquer varnish coating and some washes to give the impression of 3D. The most difficult part was painting the face and in particular the eyes. This huge magnifying glass made the job a little bit easier.


For the ground, I used material bought from the 100 yen store. First, I cut out some color boards and glued brown soft clay on top. I placed the vehicle on the clay to create marks and then, I covered the ground with Mr. Weathering paste. This YouTube tutorial helped me a lot.


For the diorama plate, I reused the lettering design from the kit's box. Using a laster printer, I printed an inverted version of the design on pattern transfer paper (yellow). Then I attached the paper to a copper plate and put it through a laminator multiple times. The heat coming from the laminator causes the laser toner to dissolve and get attached to the copper plate. After that, I used ferric chloride to etch the uncovered copper.


I used a small piece of wood from the 100 yen store for the base. To make it look better, I applied multiple layers of water-based acrylic varnish with mahogany color. It's important to apply thin layers and sand them off before applying the next layer.


Making this diorama took me way more time than what I had expected but I learned many new techniques and tricks in the way so I am glad I built it.

Tamiya M26 Pershing 1/48 making and focus stacking

Continuing with my series of posts about scale models, I built this Tamiya M26 Pershing 1/48 scale model.

Unfortunately, this time I didn't take photos during the process. However, I wanted to explain how I took all these photos.


If you are a good observer you will have noticed that all photos share a common characteristic. They are completely in focus. Normally, when you take a close-up photo like this one, some parts of the tank will be out of focus.


One option to increase the depth-of-field is to take the photo from a little further away and using a long focal distance lens. However, such lenses are usually quite expensive. The trick here is to use focus stacking. Actually, all of these pictures were taken using a very cheap (around $100) Huawei smartphone. I took them using an awesome Android application called OpenCamera.When you open the application touch the symbol with 3 dots. That will open a menu with many interesting features. One of the features I use the most is NR (Noise reduction). 


For focus stacking, you need to choose the feature indicated as "FOCUS{}" on the same menu. Additionally, on the same menu, you can specify how many photos you want to take for each shot (for example, 6 shots for each). Going back to the camera menu you will now see 3 sliders on the left. The lowest one is just for zooming. The other 2 are the interesting ones. One slider will allow you to set the source distance (the closest point that you want in focus ) and the other slider is to set the target distance (the furthest point in the tank that you want to be in focus). When you take a picture, the application will take multiple shots starting from the source distance and increasing the focus distance for each shot until the target distance. It's important that you don't move the smartphone while the application is taking the shots. The best is to put your smartphone on a tripod and use the timer for the first shot. Once you have your shots, you need a software in your PC to compose the final picture. For that, you can choose the open-source tool Combine-ZP, which uses the Pyramid algorithm. If you can afford it, there are also good commercial tools such as Helicon or Zerene.


Some of you may have been wondering why I was using that green clothing for the background of my pictures. Now you now. If you search for "green screen removal with Photoshop" on Google, you will find techniques to remove the green background and substitute it with any picture you want.


In this case, I am using photos from https://unsplash.com/ which is a very useful site.

Tamiya Jagdpanzer IV/70(V) LANG (Sd.Kfz. 162/1) making

 After the 1/72 Tiger I, I decided to build the German tank Jagdpanzer IV kit that I got when I won a prize for my greyhound vignette.


This was my first 1/35 kit. As a beginner, I normally go for the 1/48 scale kits which are less expensive.


One of the most interesting parts of this kit was modeling the Zimmerit. Zimmerit was used to make it difficult to attach magnetic anti-tank mines onto the hull. To apply the Zimmerit, I created my own tools out of Tamiya putty basic type's lid, some runners from the kit, and a bit of Tamiya epoxy putty.


For the Zimmerit itself, I used yet another type of epoxy putty. You can use this menthol cream on your fingers to avoid the putty sticking to them.


I applied a coating of Mr. Oxide surfacer and on top of that, I airbrushed the base color and camouflage patterns using acrylic gouache.


After that, I had some fun (maybe too much) weathering the hell out of this tank. I also prepared an initial base for the tank using 100 yen soft clay, but I wasn't very successful.


I created a new base from scratch using cheap wood parts from the DIY home center. Then I applied some acrylic colored varnished in multiple layers, sanding them each time. Finally, I prepared the volume of the ground using some styrofoam.


I took some pictures outside and then added a background using photoshop. This is the end result.

Zvezda Tiger I (early production) 1/72 scale

One year after my greyhound diorama, my mum sent me a plastic model kit as a Christmas present. At first, I didn't like it very much but there was no reason for throwing it away.


In fact, it was a nice surprise that the kit was so easy to assemble and it didn't require gluing the plastic parts.


As it was just a cheap kit, I decided to experiment a little bit. Instead of using a proper primer spray can, I applied a coating of white acrylic gouache.


On top of that, I used black gouache to add gradations and weathering marks. Weathering is normally done during the later stages, but I wanted to investigate how it would look like if I did them from the beginning.


I protected the black and white paint with transparent lacquer varnish. On top of that, I applied a coating of Mr. Weathering color filter shade blue. Then, I glued the decals and applied a new layer of lacquer varnish.


Next, it was time to paint all the parts using acrylic gouache. The exhaust pipe was painted in steps: from darker to orangish color. Dilute the gouache a lot to create interesting rust effects.


Probably not very realistic, but the process was fun and not too convoluted.


Finally, I reused the base of my greyhound diorama and decorated it with stones and plastic plants.